
Running Active Directory in Home Lab with Oracle VirtualBox (Part 2):
Configuring Active Directory Services
Set up Active Directory Domain Services and Automate Domain Users Creation with PowerShell.
Project information
- Title: Active Directory Home Lab
- Organizer: Self
- Project date: June, 2020
- URL: ajithchandranr.github.io
A domain controller functions as a server that oversees network access, verifies user credentials, and enforces security policies. It comprises essential elements that facilitate the operation of a Windows domain environment, including Active Directory, LDAP, DNS, Certificate Services, Kerberos, Group Policy, and Network Time Protocol (NTP).
Active Directory serves as a centralized database responsible for storing and overseeing information pertaining to network resources, such as users, computers, and devices. It empowers administrators to efficiently manage access to these resources and effectively enforce security policies throughout the network.
Within the Active Directory, users and resources are represented as objects, each possessing a distinctive identifier known as a security identifier (SID). These objects are equipped with a collection of attributes that delineate their characteristics, encompassing details like their name, address, and security permissions.
In this article, our objective is to configure Active Directory services on the server set up in Part 1. We'll also explore how to use PowerShell to automate the process of quickly creating 200 domain users, catering to the needs of a small business organization.
. . .
Active Directory Setup
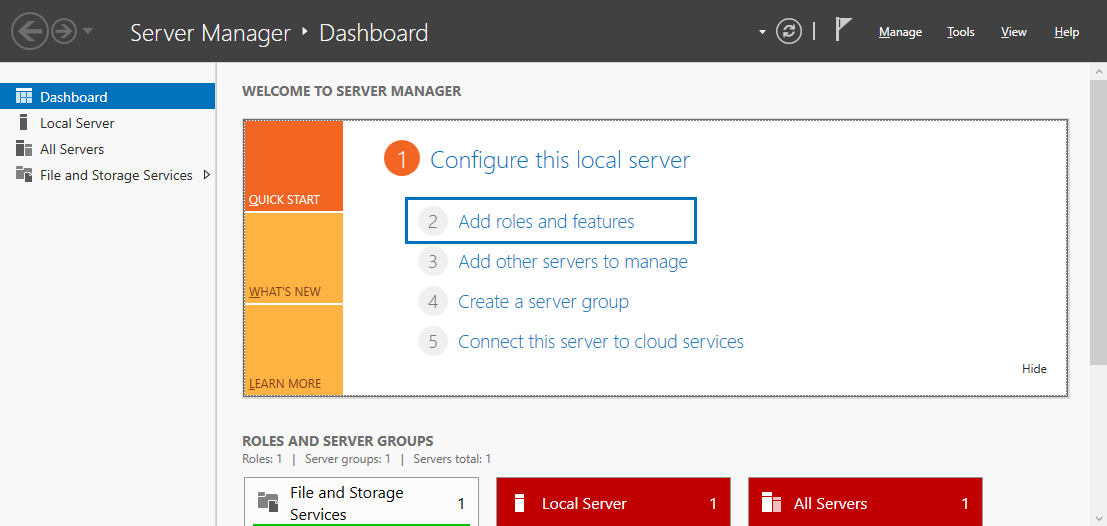
To get started with installing Active Directory services and creating the forest root domain called "mydomain.org", we click on the "Add roles and features" option in the server's dashboard. This enables us to add the AD role and begin the setup process.
When it comes to the server's role within a network, there's a difference between "roles" and "features." In this lab, the role refers to the server's specific function, which is acting as a domain controller with the Active Directory role. On the other hand, features are the extra capabilities that come along with the role, like AD administration tools, AD DS tools, Group Policy Management, and so on.
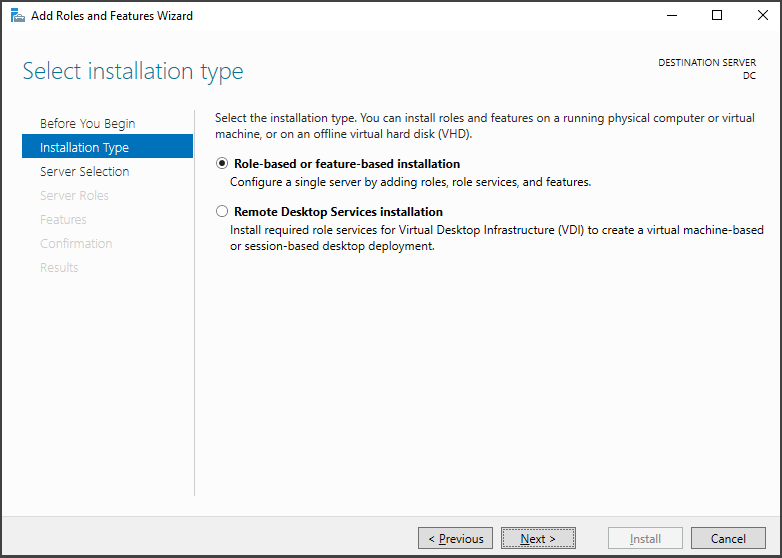
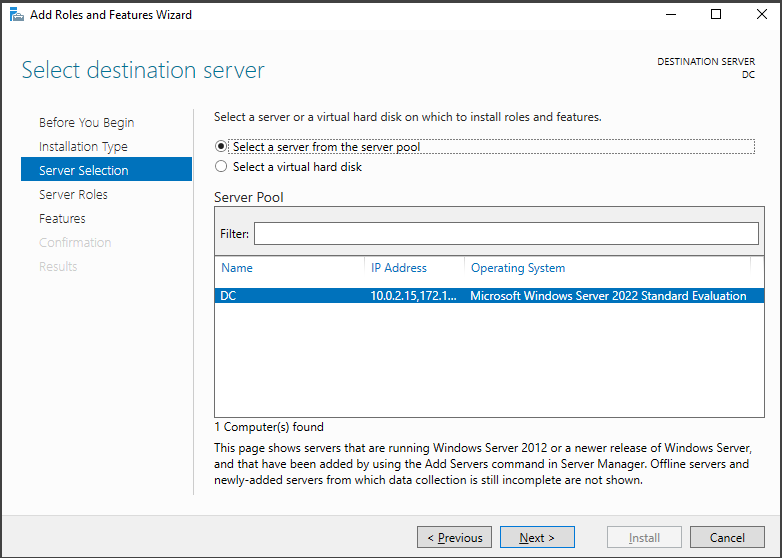
Within the Setup Wizard, opt for the installation option labeled as "Role-based or feature-based." This choice is appropriate because the role will be added directly to the virtual machine, rather than being installed remotely via a Virtual Desktop Infrastructure (VDI).
Proceed by choosing the server "DC0" from the list of available servers in the Server Pool. Once selected, click on the "Next" button to continue.
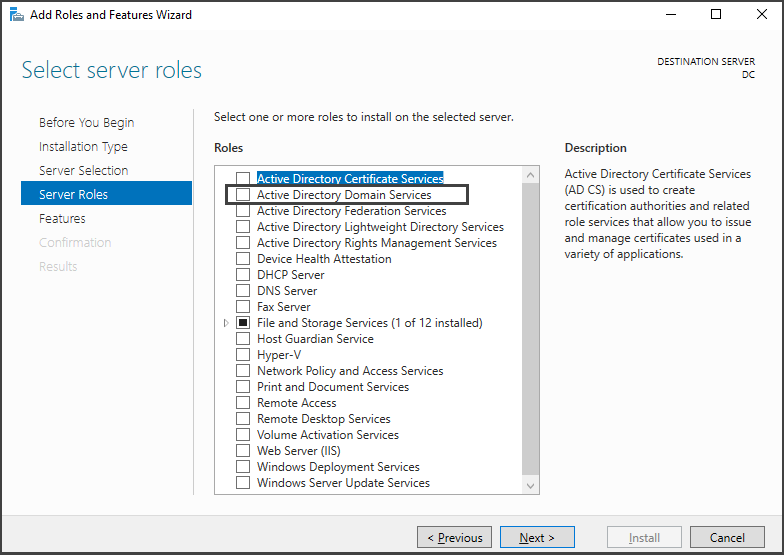
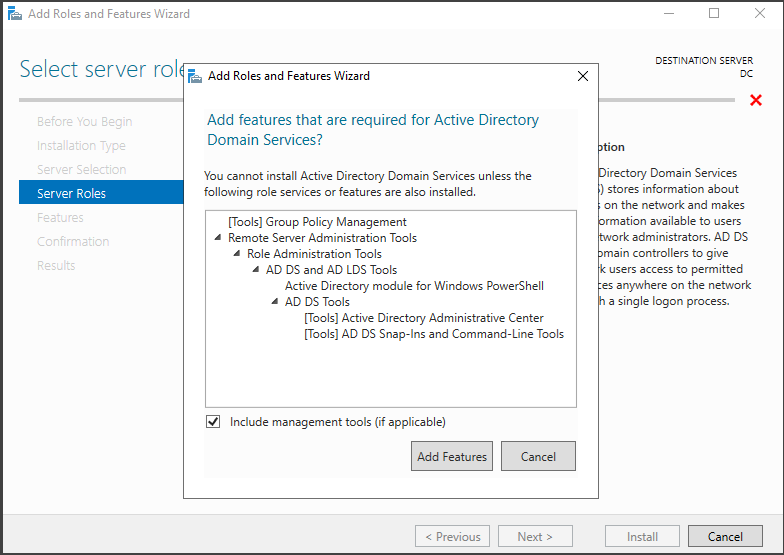
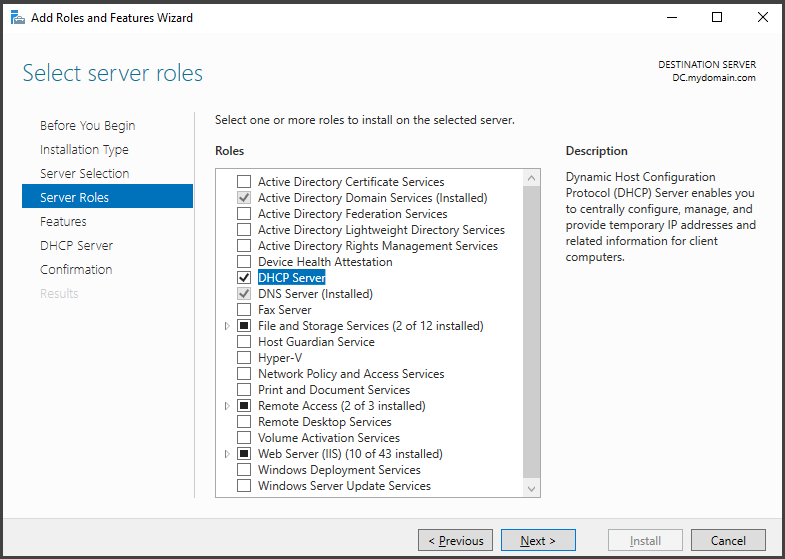
In the Server Roles section, check the box for "Active Directory Domain Services" and click on "Add Features." This will install the extra capabilities that come with this role.
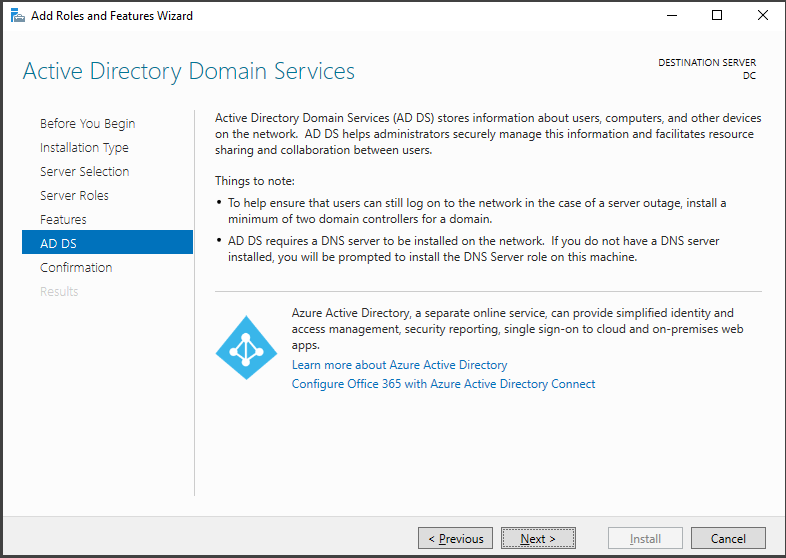
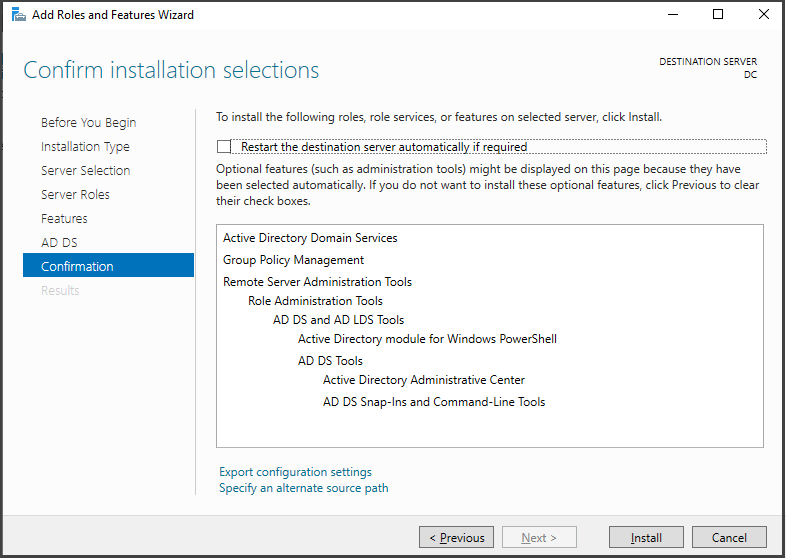
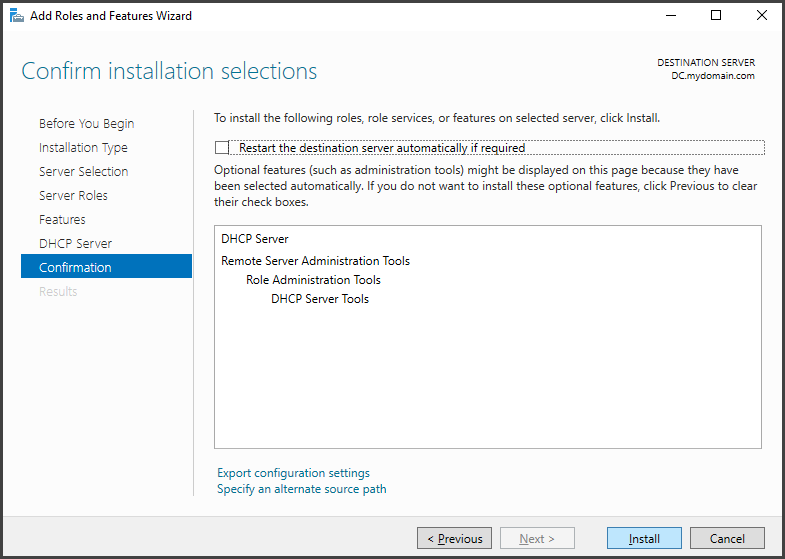
In the "Features" and "AD DS" sections, there's no need to make any modifications. Simply click "Next" until you reach the "Confirmation" section. Once there, click on the "Install" button to initiate the installation of the services.
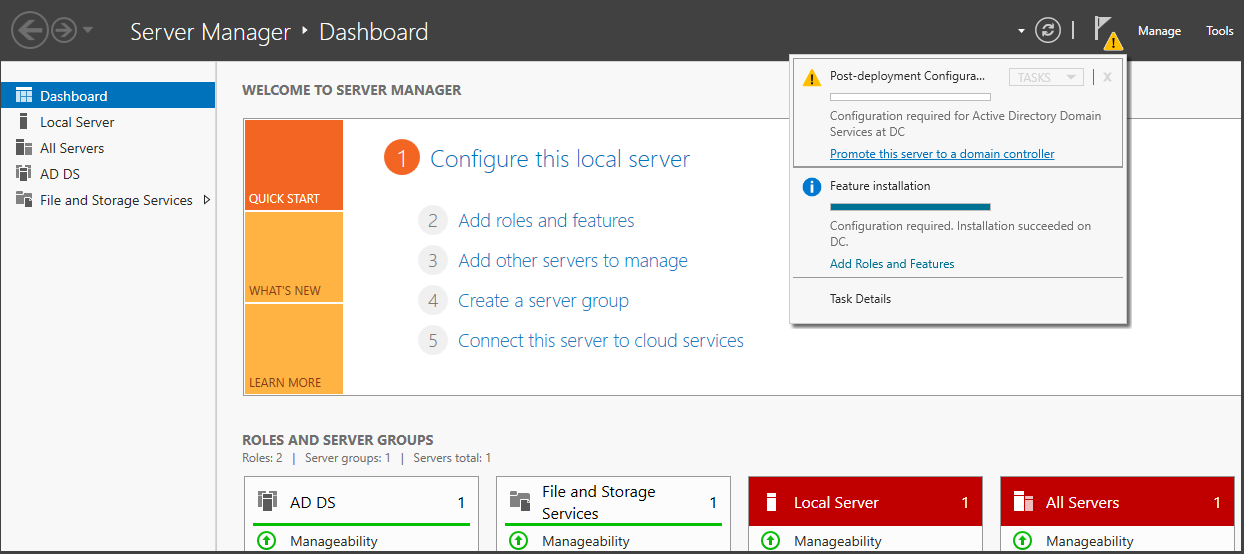
Once the installation process is finished, a notification will appear regarding the Post-deployment Configuration. This notification will inquire whether you wish to promote the server to a domain controller.
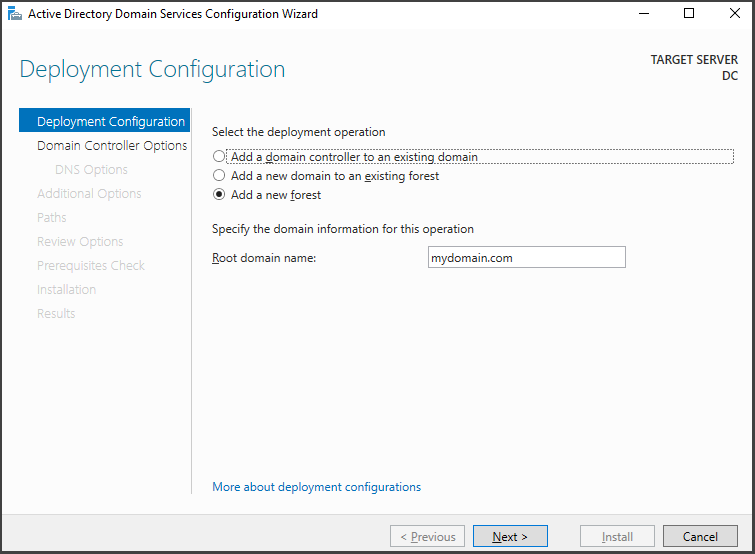
Click on the notification to initiate the Domain Controller configuration. From there, choose the option to "Add a new forest" and assign the name "mydomain.com" to the lab forest.
A forest is a big container that holds all objects and configurations in the Active Directory structure ( ex: child domains, users, computers, groups, policies, schemas, etc.)-
Additionally, a forest serves as a security boundary, signifying that objects within separate Active Directory forests cannot interact with one another unless a trust relationship is established between the desired forests.
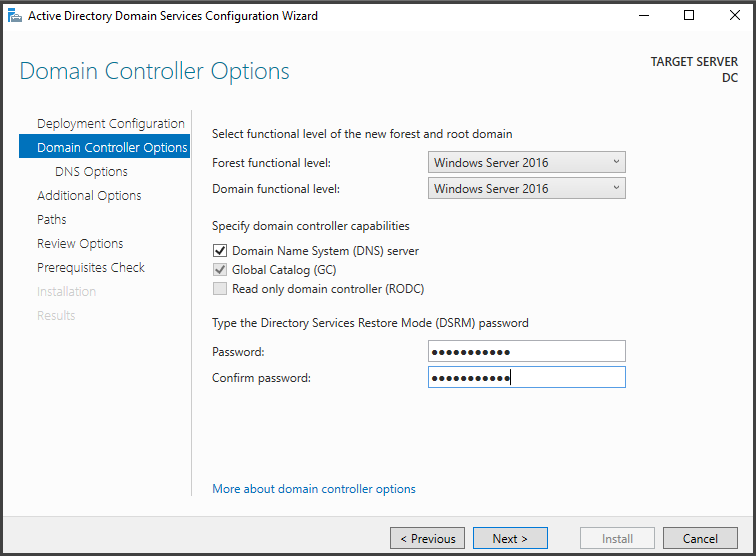
Next, we verify that the "Functional Forest level" is set to Windows 2016, which represents the highest level accessible, and select a password for the "Directory Services Restore Mode (DSRM)."
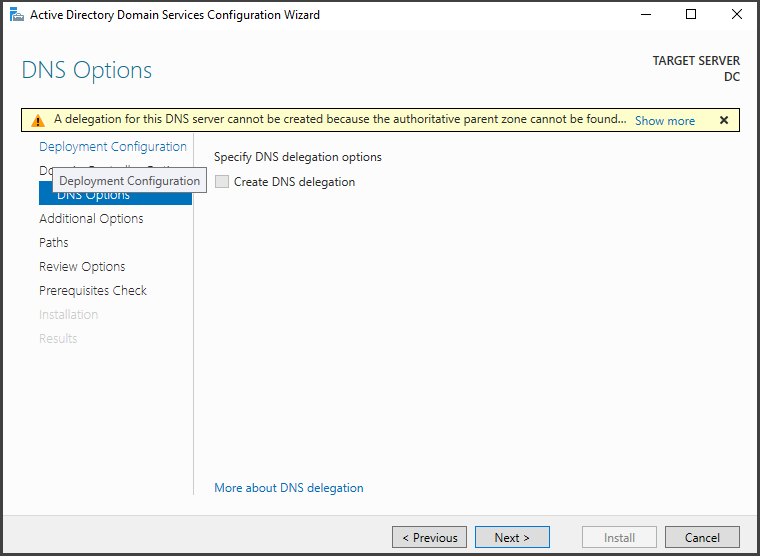
Regarding the "DNS Options," we will leave the "Create DNS Delegation" option unchecked and proceed by clicking "Next."
The functional level is the capabilities that Active Directory supports, and it also determines which Windows Server operating systems you can run on domain controllers in the forest. The Windows 2016 functional level supports running Windows 2022 on the DC.
Directory Services Restore Mode (DSRM) is a special boot mode only available on the domain controller that allows the domain administrators to log into the domain controller using the DSRM password when the Active Directory fails. It is the local administrator account for the domain controller server.
Safe mode grants Domain Administrators (DAs) access to the Active Directory database for the purpose of restoring or repairing objects.
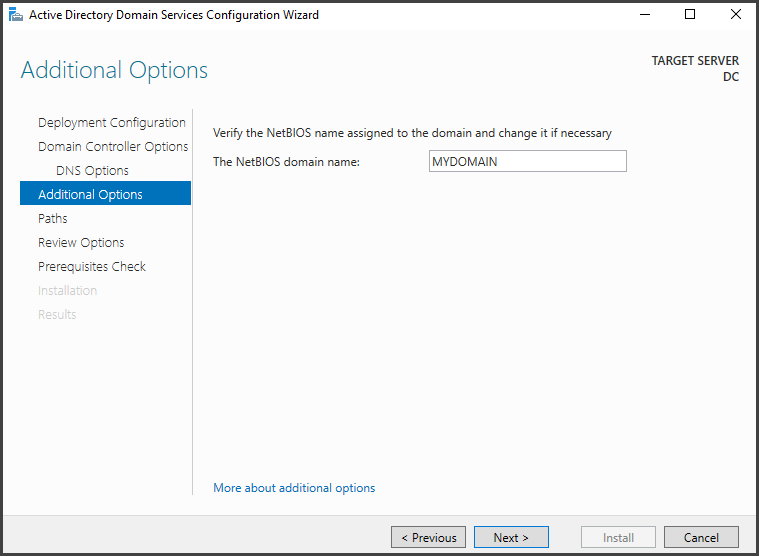
Verify the NetBIOS domain name and click “Next” to move to the “Paths” section.
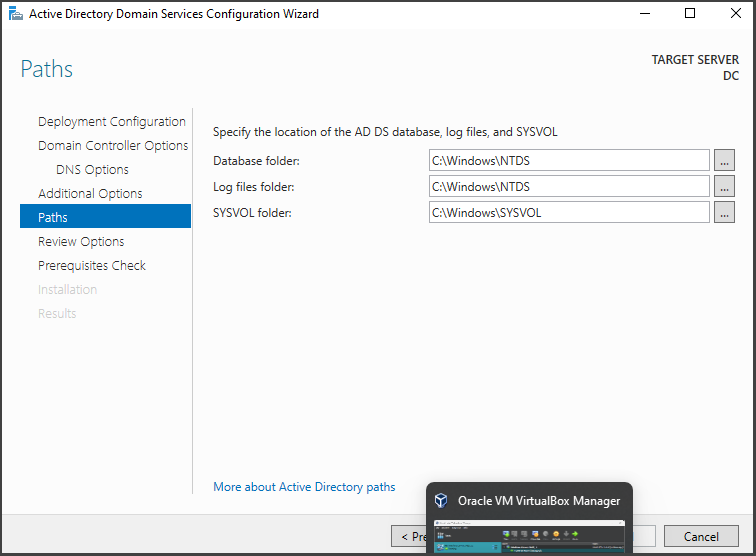
The path locations specified are for the Active Directory database (NTDS), the Log files, and the SYSVOL folder. It is advisable to retain the default paths to avoid any potential issues in the future. We will proceed by clicking "Next."
NTDS is a database that stores Active Directory data, including information about users, computers, groups, and network resource objects.
SYSVOL folder is situated directly on the domain controller, housing various public files, folders, and essential components like Group Policy Objects (GPOs) and scripts. These resources are utilized for effective management of domain users and computers within the forest.

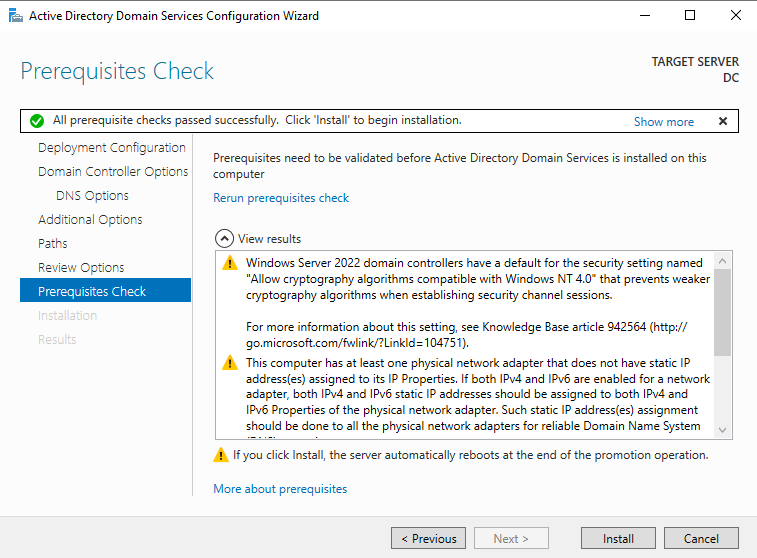
Now that we have everything set up for the Active Directory, we can get started with the installation process by simply clicking on the "Install" button in the "Pre-requisite Check" section. It'll only take a few seconds, and once it's done, you'll need to reboot your machine.
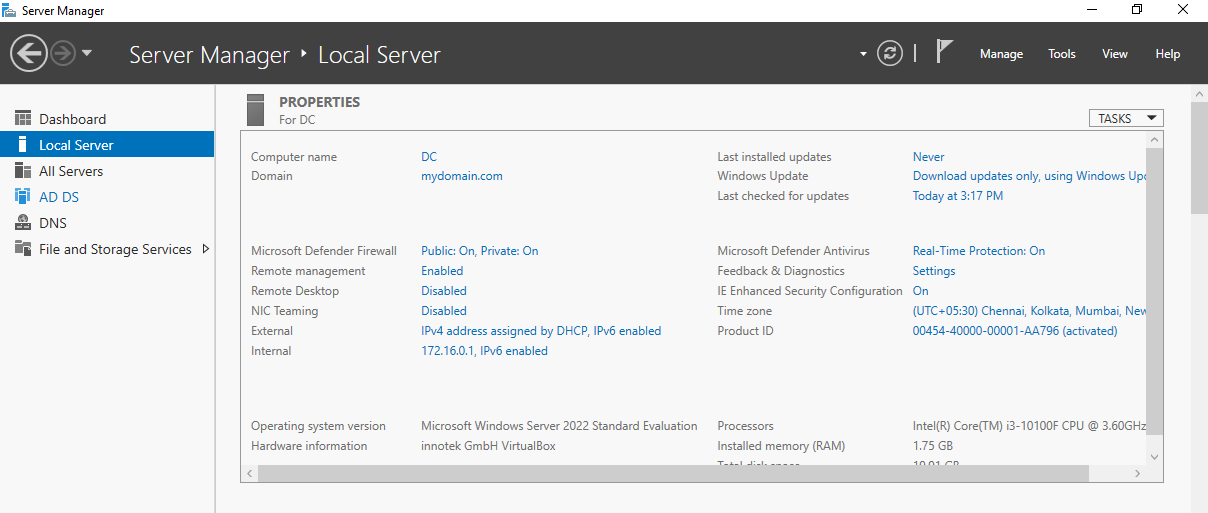
Once the machine has been restarted, we can proceed to the server dashboard and verify the presence of the newly created domain "mydomain.com".

Once Active Directory is installed, it's a good idea to take a snapshot of the current state before adding domain users. This will help preserve the system in its current configuration.
Installing RAS/NAT
We will install Remote Access Server (RAS) and Network Address Translation (NAT) on the domain controller. This installation aims to enable our Windows 10 client, which we will set up later, to connect to a private virtual network while still having internet access through the domain controller.
This configuration ensures that our clients can effectively access the internet while connected to the private network using the RAS and NAT components installed on the domain controller.
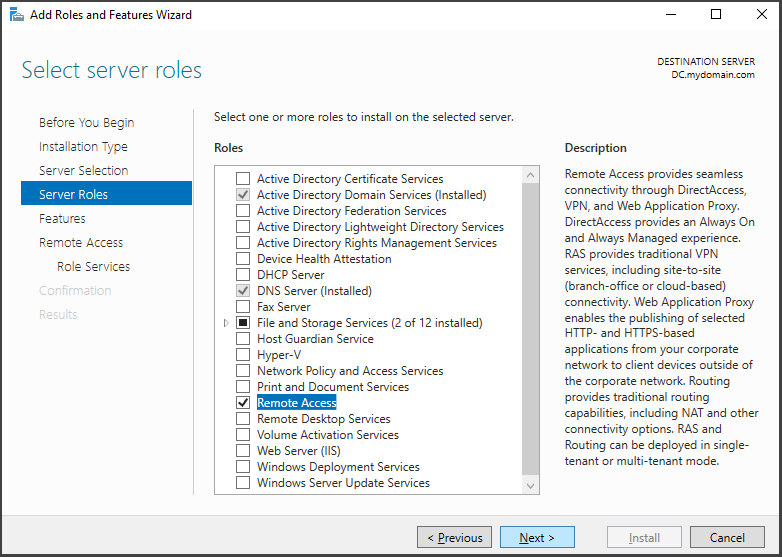
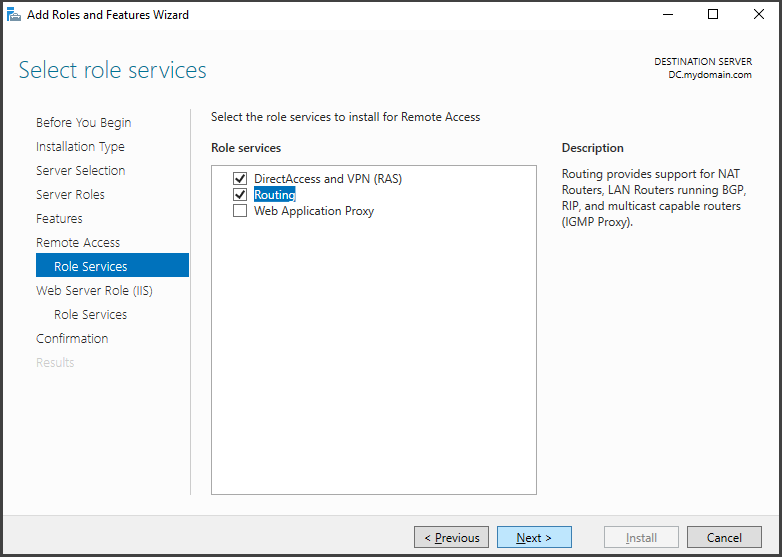
Launch "Server Manager" and select "Add new roles and features." Click 'Next' until reaching the "Server Roles" section. Choose "Remote Access" as the role. Proceed by clicking 'Next' to "Role Services," select "Routing," and click "Add features." Move to the "Confirmation" section, and click "Install" to begin the installation process.

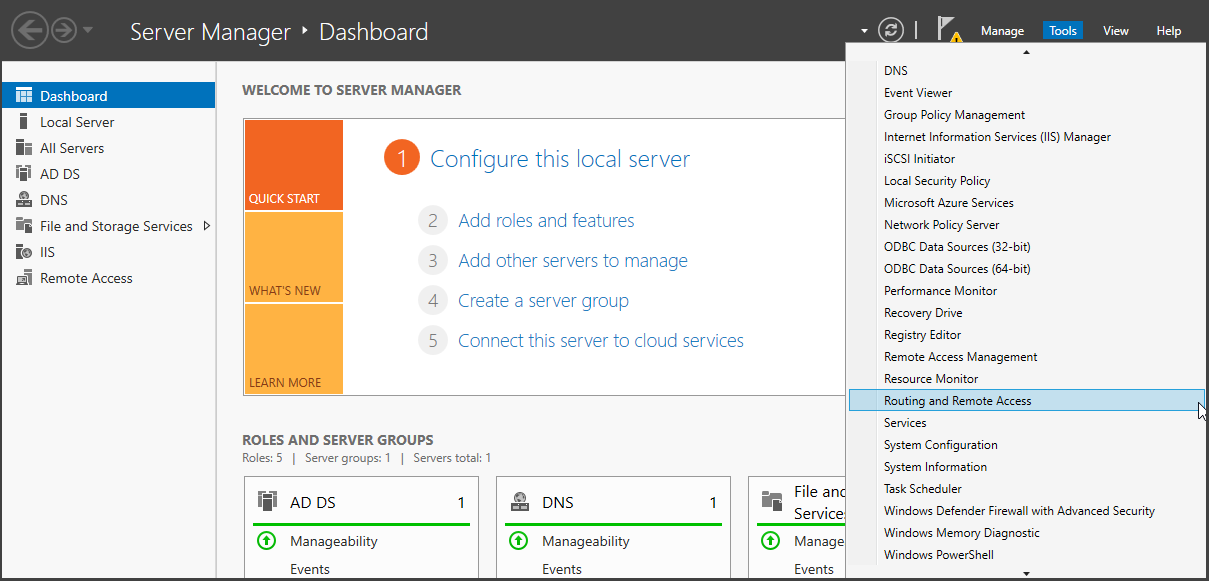
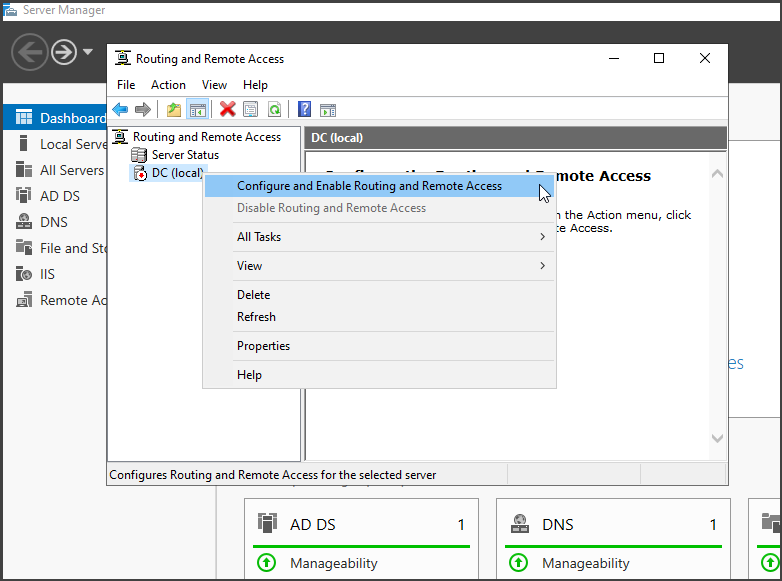
To complete the setup, open "Server Manager" and select "Tools" -> "Routing and Remote Access." Right-click on your domain controller (e.g., "DC") and choose "Configure and Enable Routing and Remote Access."
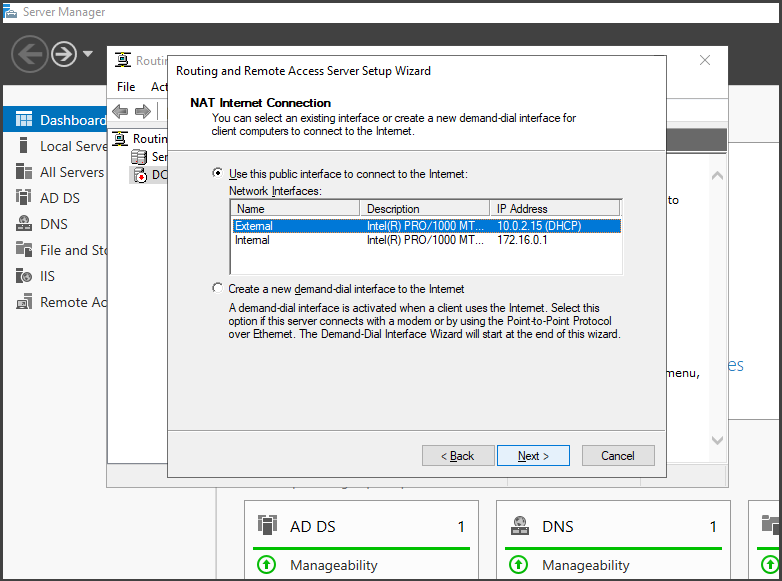
Follow the Setup wizard by selecting "Next" and choose "Network Address Translation (NAT)." In the NAT Internal Connection window, select the connection with internet access (e.g., "External"). Click "Next" and then "Finish" to successfully install RAS/NAT.
Setting Up a DHCP Server
We will be configuring a DHCP server on our domain controller, which will provide IP addresses to our Windows 10 clients. This setup will enable our clients to connect to the internet and browse websites, even though they are connected to a private internal network, similar to an office or school environment.
DHCP stands for Dynamic Host Configuration Protocol. It is a network management protocol used to automatically assign IP addresses and other network configuration settings to devices on a network.
Open "Server Manager" and navigate to the "Add new roles and features" option. Follow the on-screen instructions, clicking 'Next' until you reach the "Server Roles" section. From there, select "Remote Access" and click "Add features" to include it. Move forward to the "Confirmation" section, and initiate the installation by clicking "Install."

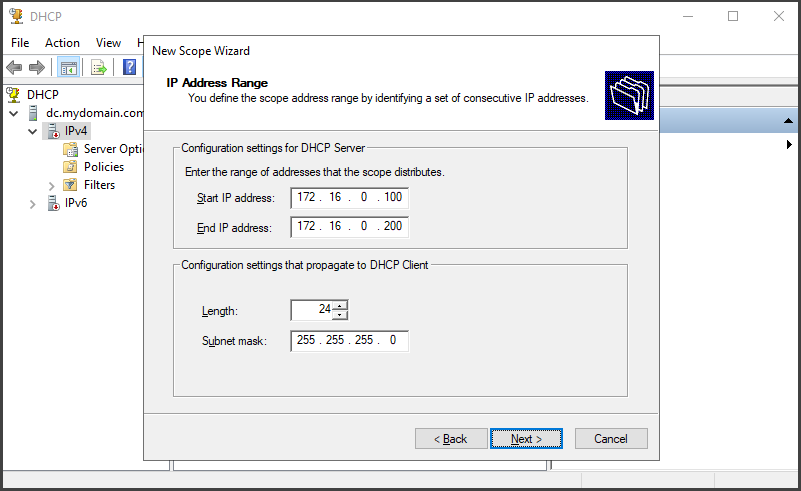
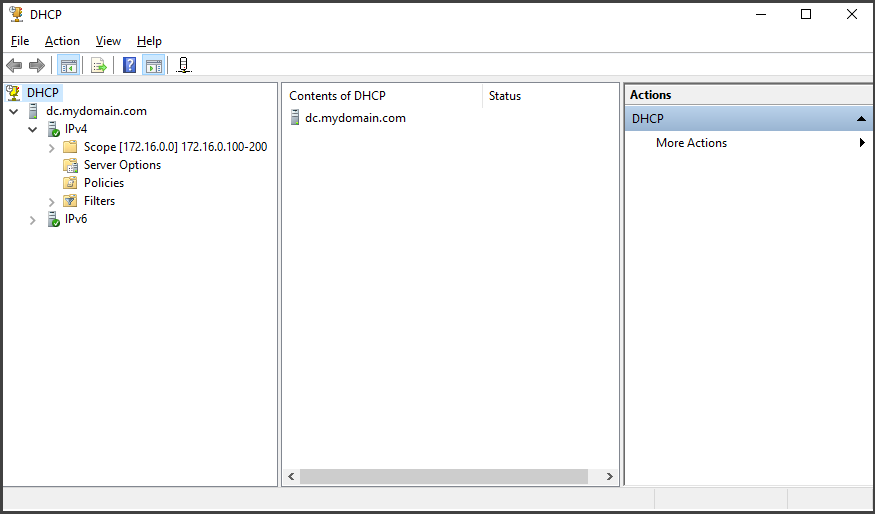
We're going to create a DHCP scope that will assign IP addresses in the range of 172.16.0.100 to 172.16.0.200, using a subnet mask of 255.255.255.0.
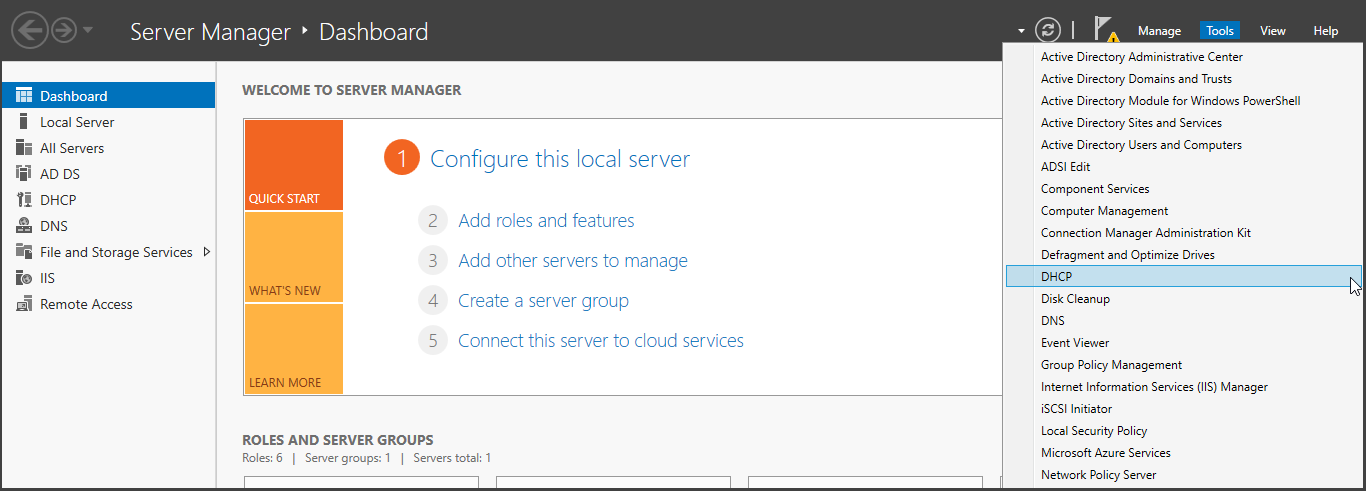
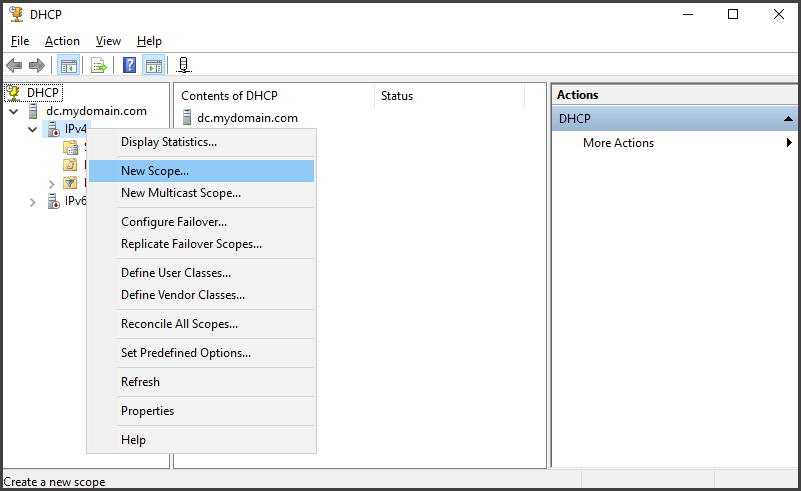
Open "Server Manager" and look for the "Tools" option at the top-right corner. Click on it, and from the dropdown menu, select "DHCP" to access the DHCP Server. Once inside, expand the DHCP Server and right-click on the "IPv4" category. In the context menu, choose "New Scope" to begin creating a new scope.
Click "Next" and proceed to the "Scope Name" section. Since we are in a lab environment, we will assign the name "172.16.0.100-200" to the scope. Click "Next" to continue. For the "IP Address Range" configuration, set the "Start IP address" as 172.16.0.100 and the "End IP address" as "172.16.0.200". Use a "Length" of "24" and a "Subnet mask" of "255.255.255.0".
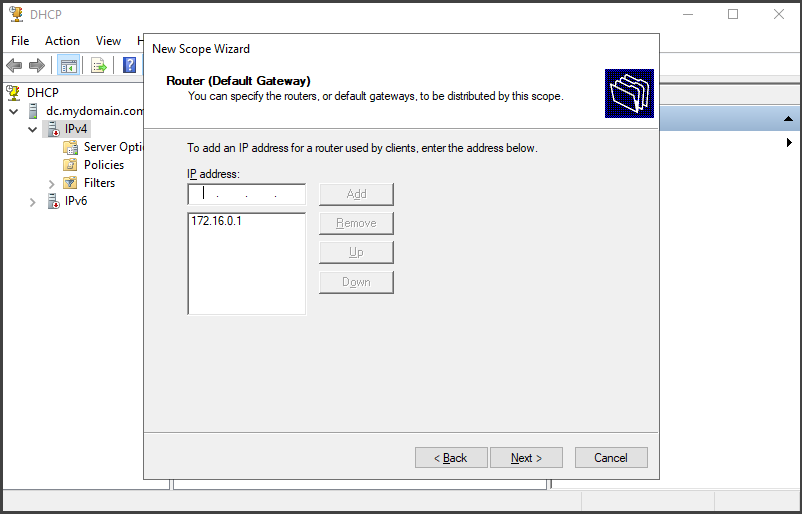
Continuing from the previous step, click "Next" through the "Lease Duration" section without making any changes, as we will leave the preferences as they are for this lab. In the "Router (Default Gateway)" section, enter the IP address of your Domain Controller as "172.16.0.1" in the "IP address" column. Click "Add" and then click "Next".
Moving on to the "Domain Name and DNS Servers" section, input "mydomain.com" in the "Parent domain" column since we are using the domain controller as our DNS server. Click "Next" to proceed. Keep the settings as they are until you reach the end of the wizard, and then click "Finish" to complete the DHCP scope configuration.
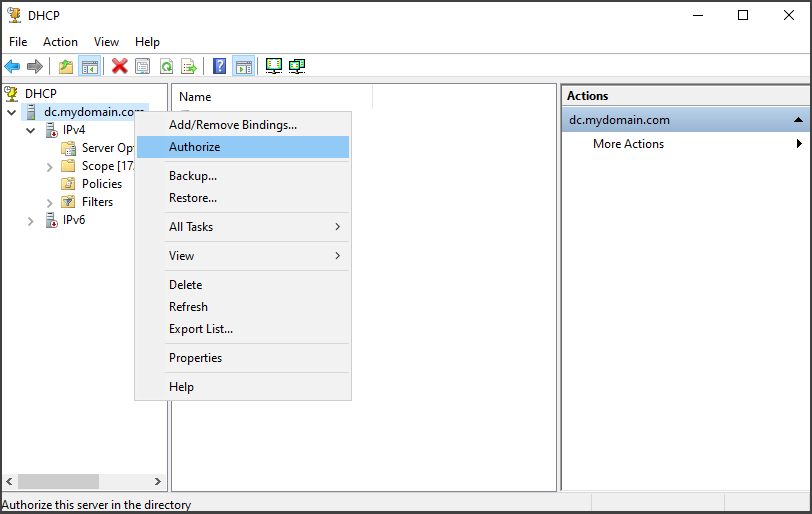
Afterward, right-click on the DHCP Server and select "Authorize". Then, right-click again and choose "Refresh" to ensure the changes take effect.
Lease durations determine the period for which devices are assigned IP addresses on a network. They specify how long an IP address is allocated before it needs to be renewed or released.
Adding Domain Users
To add domain users, you have the option of manually adding them or using a PowerShell script like CREATE_USERS.ps1 developed by Josh Madakor, which creates multiple domain users in bulk
Method #1 Creating Domain Users Manually
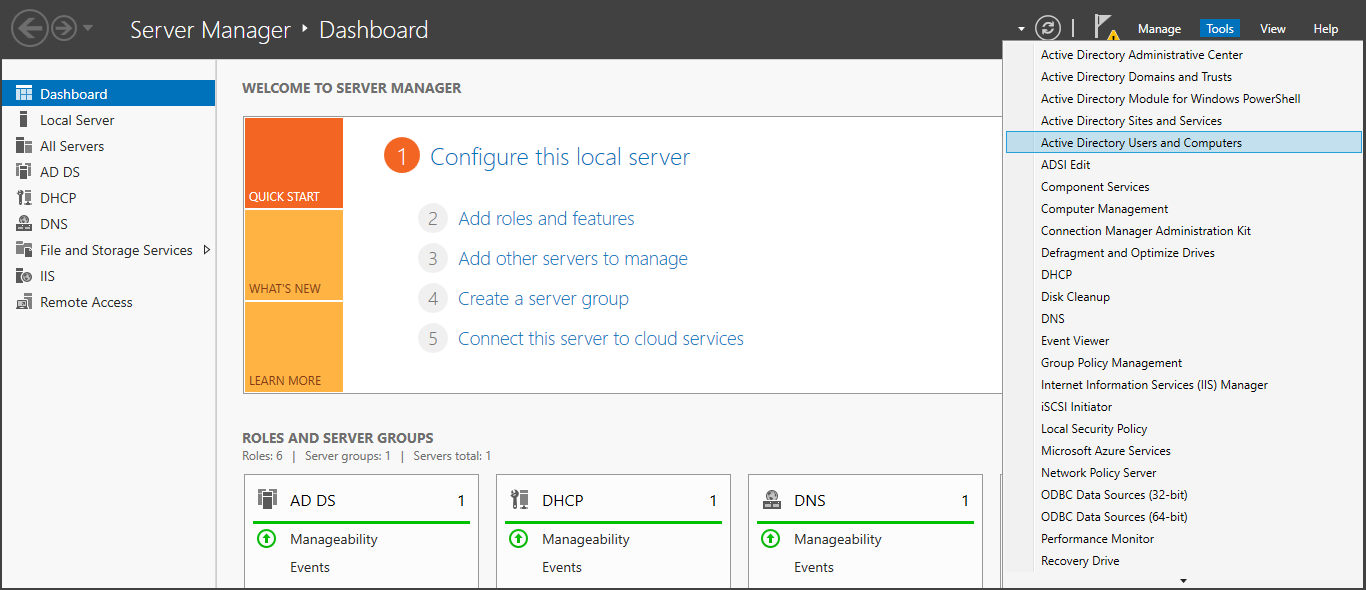
To create a new domain user, access the Server Dashboard, locate the "Tools" section, and select "Active Directory Users and Computers."
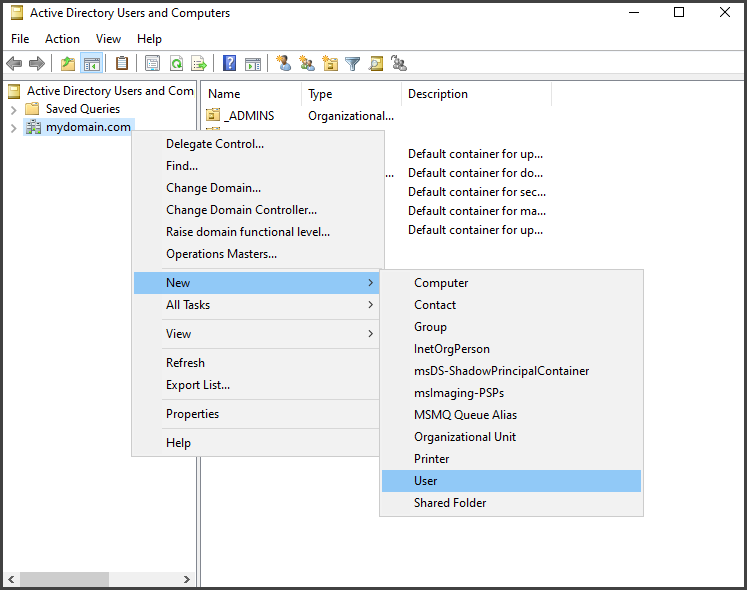
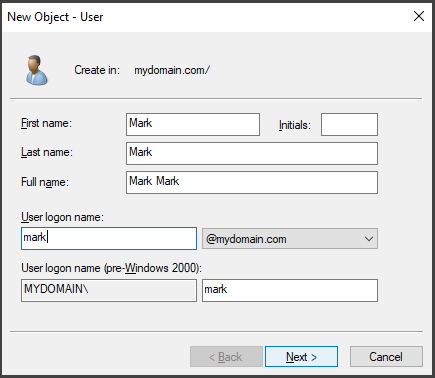
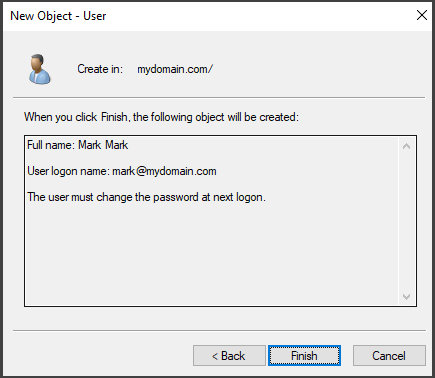
In the ADUC window, right-click on the domain name "mydomain.com" and choose "New" and then "User"
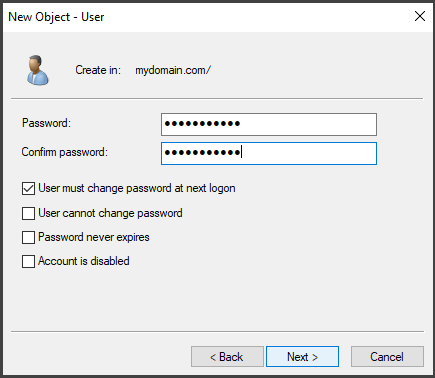
Next, provide the necessary user information and set a password for the user. In a typical scenario, it is common to leave the "User must change password at logon" option checked. This allows the user to change their password when they log in to their account from their workstation for the first time.
To simplify management, for the lab, you can uncheck the box and enable the "Password never expires" option.
Method #2 Automating Domain Users Creation With PowerShell
The PowerShell script we will utilize, named "Create Users," generates numerous domain users with a default password of "MS@6264" and subsequently assigns them to a newly created Organizational Unit named "_Users." These domain users are created based on the list of names provided to the script. In the GitHub report, Jon employs a names.txt file containing a list of 1000 users to generate the domain accounts.
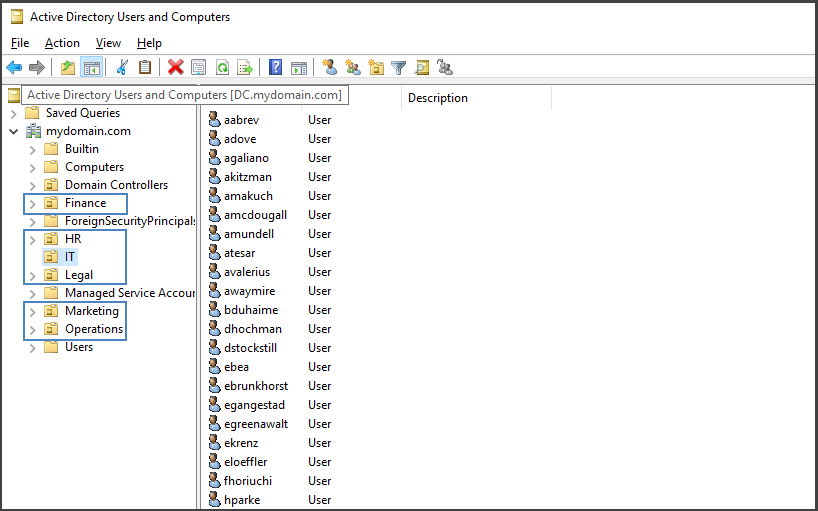
To suit the scale of our lab, I will customize the script to generate six standard Organizational Units: Marketing, Finance, Operations, Human Resources, Legal, and IT. Additionally, the modified script will create 200 domain users.
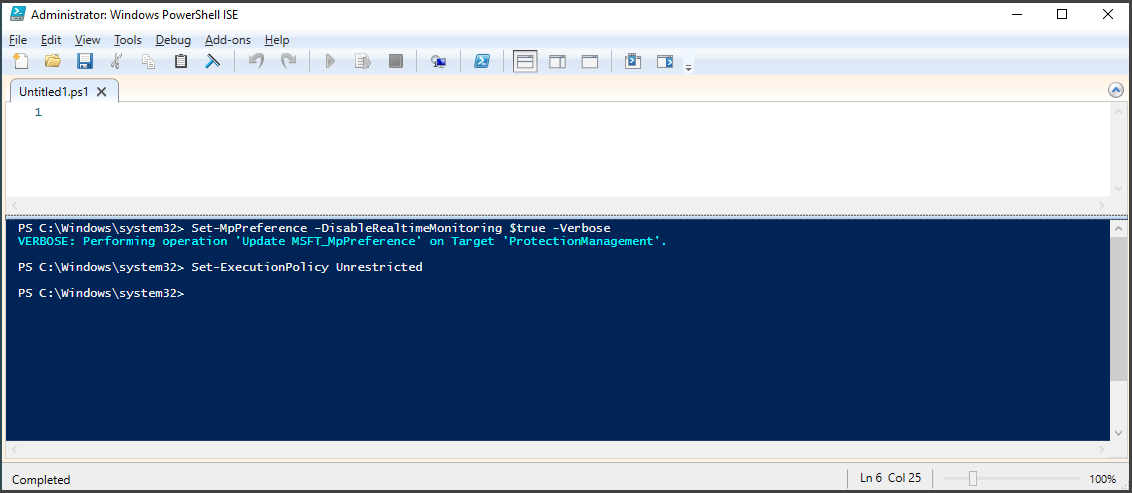
To begin, you can download the zip file from the GitHub repository. Before extracting the downloaded file, it is recommended to disable Real-Time Monitoring and set the PowerShell Execution Policy to "Unrestricted." I have also customized the script to align with my preferences.
Disable Real-Time Monitoring:
Set-MpPreference -DisableRealtimeMonitoring $true -Verbose
PowerShell Execution Policy
Set-ExecutionPolicy Unrestricted
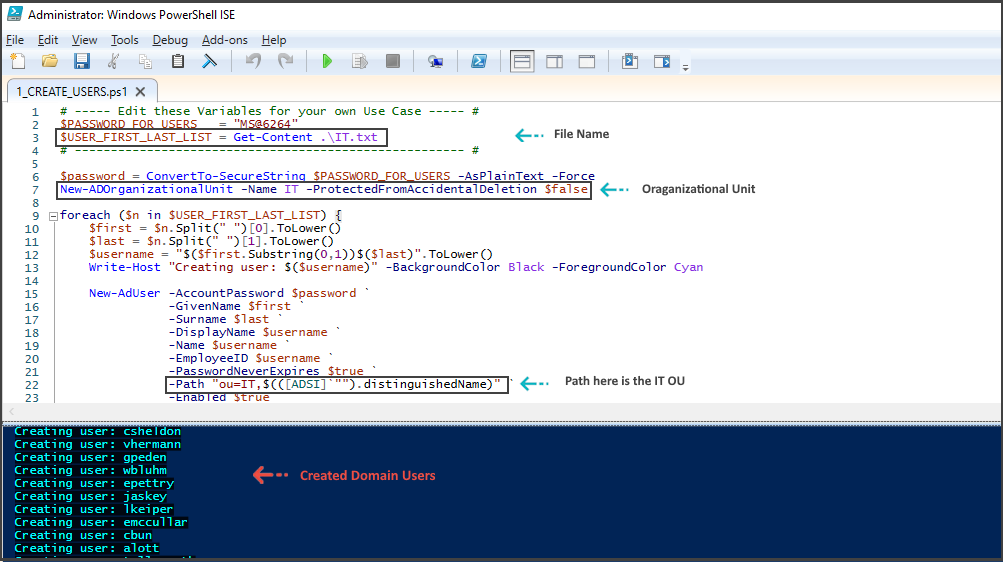
    # ----- Edit these Variables for your own Use Case ----- #
    $PASSWORD_FOR_USERS   = "MS@6264"
    $USER_FIRST_LAST_LIST = Get-Content .\IT.txt
    # ------------------------------------------------------ #

    $password = ConvertTo-SecureString $PASSWORD_FOR_USERS -AsPlainText -Force
    New-ADOrganizationalUnit -Name IT -ProtectedFromAccidentalDeletion $false

    foreach ($n in $USER_FIRST_LAST_LIST) {
        $first = $n.Split(" ")[0].ToLower()
        $last = $n.Split(" ")[1].ToLower()
        $username = "$($first.Substring(0,1))$($last)".ToLower()
        Write-Host "Creating user: $($username)" -BackgroundColor Black -ForegroundColor Cyan

        New-AdUser -AccountPassword $password `
                   -GivenName $first `
                   -Surname $last `
                   -DisplayName $username `
                   -Name $username `
                   -EmployeeID $username `
                   -PasswordNeverExpires $true `
                   -Path "ou=IT,$(([ADSI]`"").distinguishedName)" `
                   -Enabled $true
    }
To open the PowerShell script, open it in PowerShell Windows ISE as an Administrator. In the script, find the $USER_FIRST_LAST_LIST variable and input the file name containing the user's list. If you have divided your 200 domain users into different files based on Organizational Units, make sure to specify the corresponding file for each unit.
I began by focusing on the IT department. I assigned the variable $USER_FIRST_LAST_LIST to the list of users in that department. Next, I replaced the New-ADOrganizationalUnit command, changing the destination from _Users to IT to create the OU specifically for the IT department. Additionally, I modified the -Path parameter to specify that the users should be added to the OU with the path ou=IT.
After making the necessary changes to the script, simply save it and run it. This will create the domain users and add them to the specified OU as intended.
If you wish to expand your lab setup, you can follow these steps to create additional Organizational Units and add users to them. Upon executing the script, return to the Active Directory Users and Computers window, where you will find the recently generated Organizational Units and domain users.
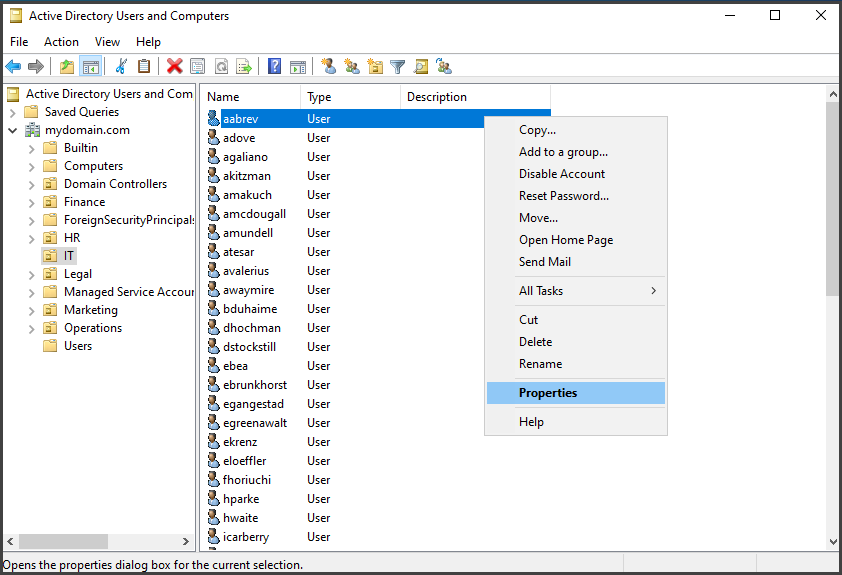
Given that we now have a sufficient number of users, let's select an individual from the IT OU to be designated as the domain admin .
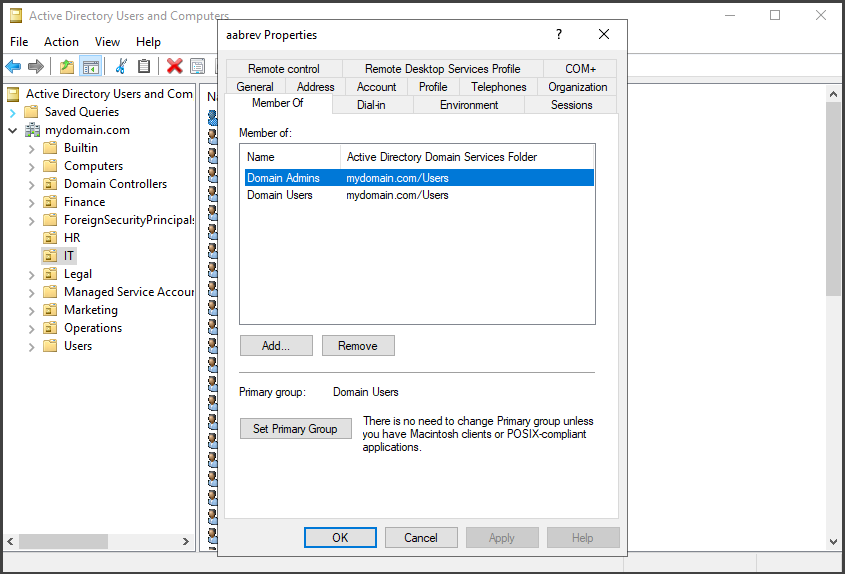
To assign a User to a group like “Domain Admins”, select the desired user like “Kcrist”, right-click on their name, and select “Properties”.
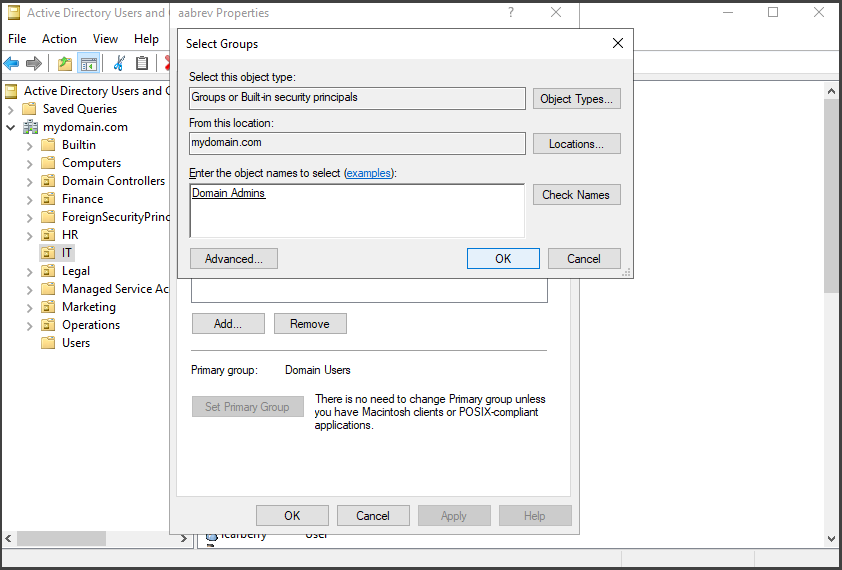
To add a user to a specific group, navigate to the "Member of" tab. Click on the "Add" button and enter the name of the desired group in the "Enter the object names" box. For example, if you want to add the user to the "Domain Admins" group, type "Domain Admins" and click "Check Names" to validate the entry. Finally, click "Ok" to finalize the process. Once added, the user's membership in the new group will be displayed in the "Member of" list.
Adding a Client to Active Directory
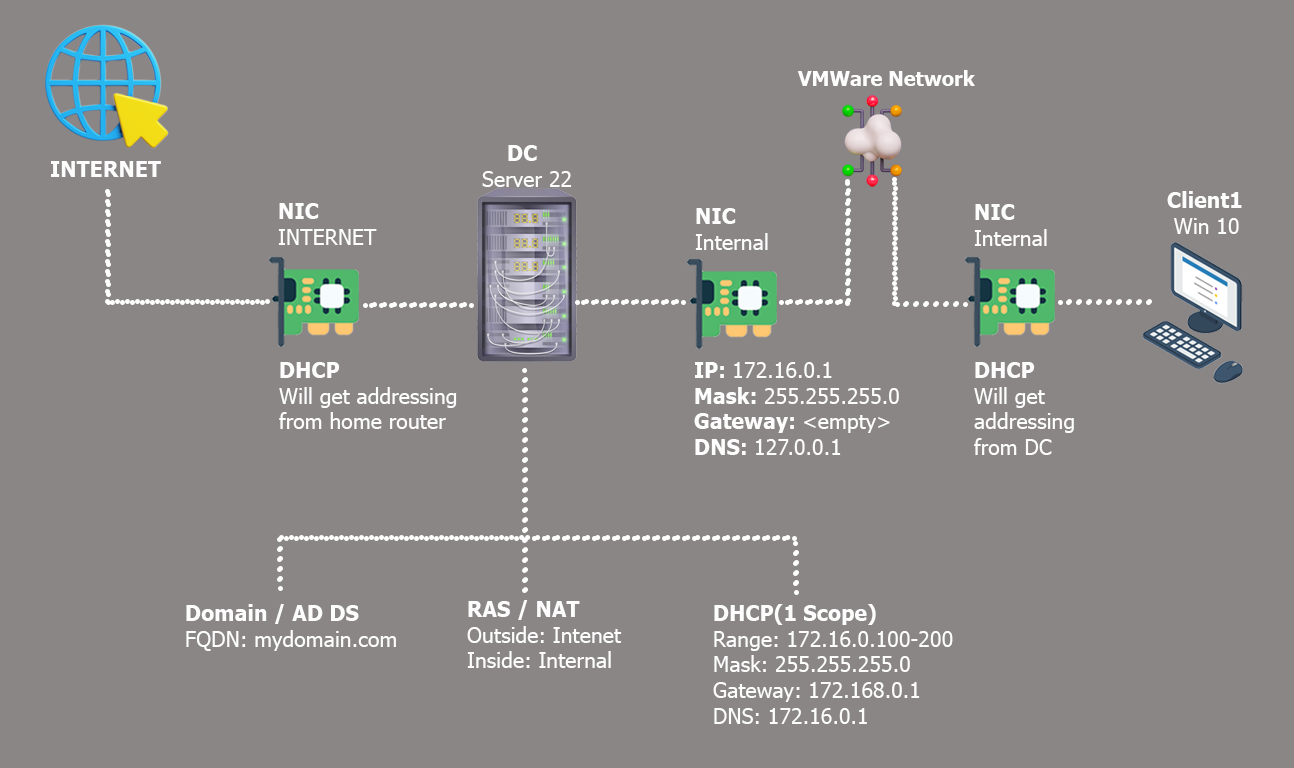
We have successfully set up our users, configured the entire environment, and established key components. Our network diagram shows that our Internet connection, NICs, domain with user setup, NAT, DHCP, and connection to the internal VMware network are all in place.
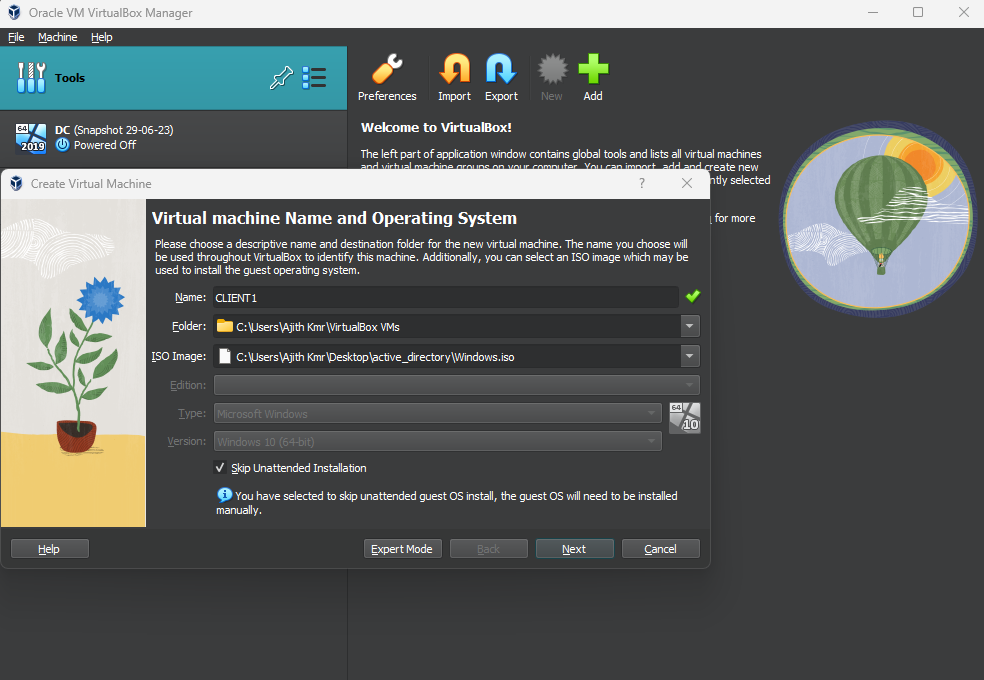
The last step is to create a Windows 10 virtual machine in VirtualBox with an internal NIC. It will obtain its IP address from the configured DHCP server. After setting up the virtual machine, we'll confirm that it successfully receives the expected IP address from the DHCP server, ensuring the network setup is functioning properly.
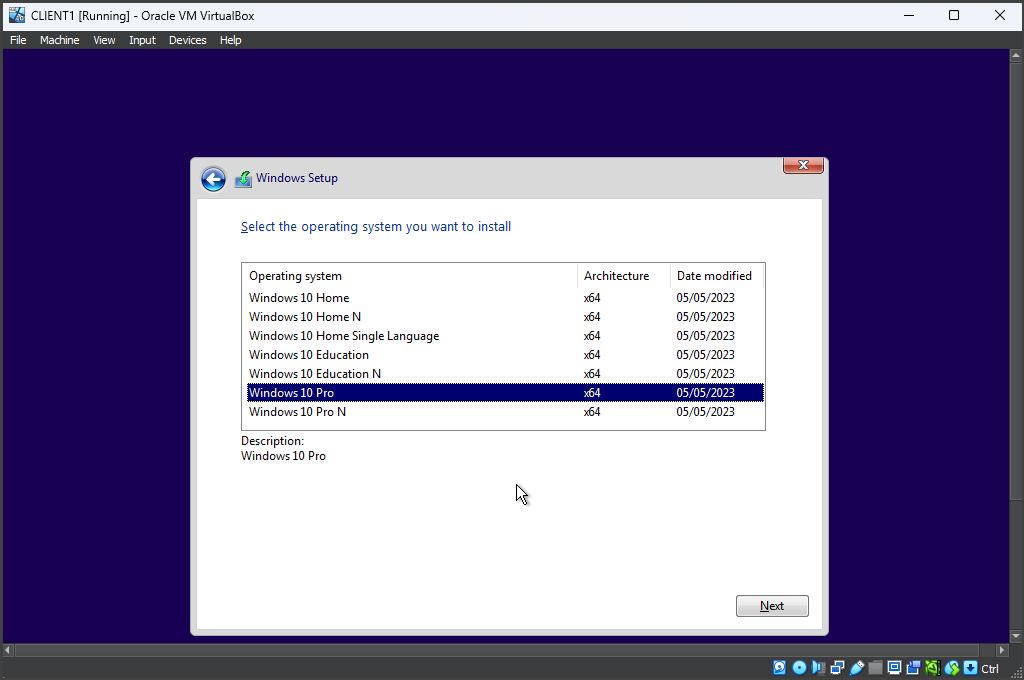
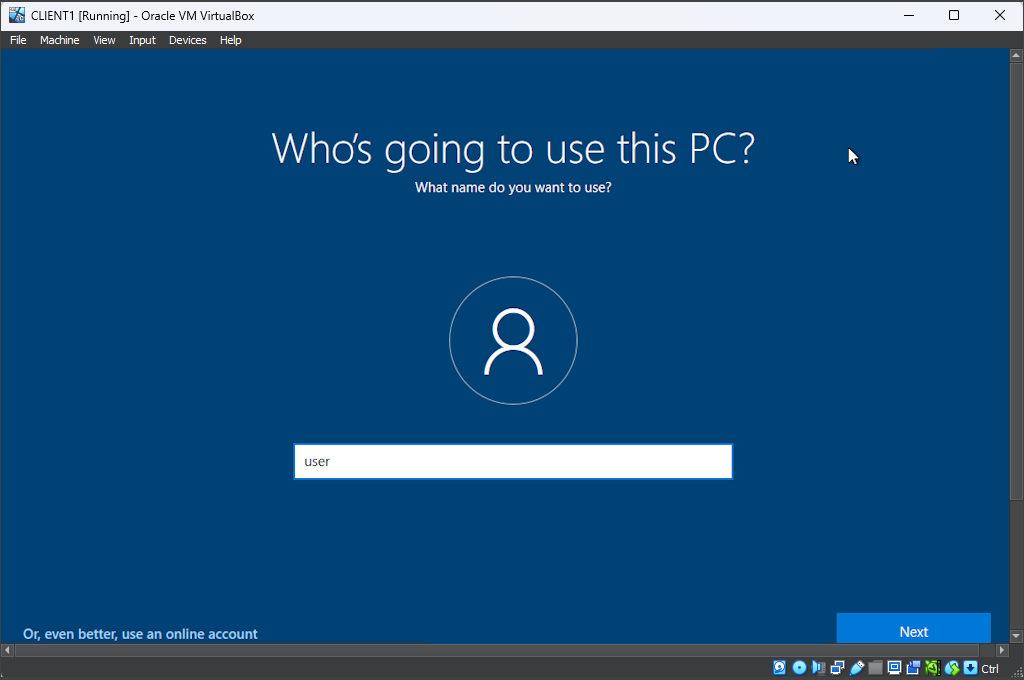
I followed the process outlined in Part 1: Windows Server 2022 Setup , naming the VM as "CLIENT1". I progressed until I reached the "Select the operating system you want to install" screen in the Windows Setup, where I specifically chose "Windows 10 Pro" as the desired operating system. Continuing forward, I arrived at the "Who's going to use this PC?" page and entered "user" as the local username. Since a password was not required, I skipped that section and proceeded to finalize the setup process.
-
Windows 10 can be found on - Link
To ensure a smooth setup process for our lab, I recommend selecting "Home" when asked about the intended use of the PC. If prompted, choose the "Limited Version" and opt for creating a local account instead of a Microsoft account. It's important to note that the setup process may undergo changes periodically, so it's always a good practice to adapt accordingly.
In order to access resources on a Windows Server Domain, it is necessary to have Windows 10 Pro as the Home edition of Windows 10 does not support domain join.
After completing the setup, I checked was the functionality of the Internet connection and the correct assignment of "IP address" to the client PC. While I was able to ping "www.google.com", I noticed that the IP address assigned to the client PC was that of the "NAT (Home Network)" instead of the "Internal Network Adapter" I intentionally configured. This configuration was set up to enable us to obtain a DHCP address from the domain controller, as we are attempting to simulate a corporate network environment.
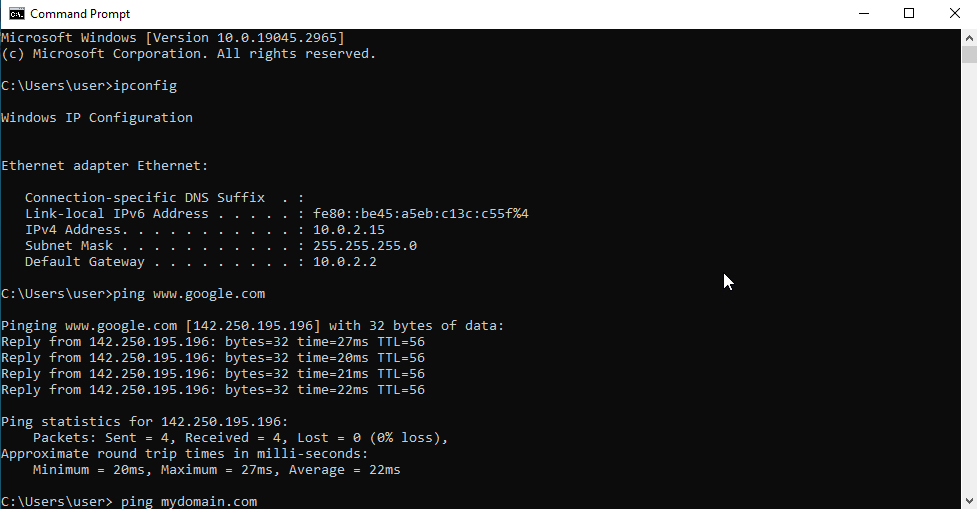
This here situation called for some good ol' troubleshooting, partner.
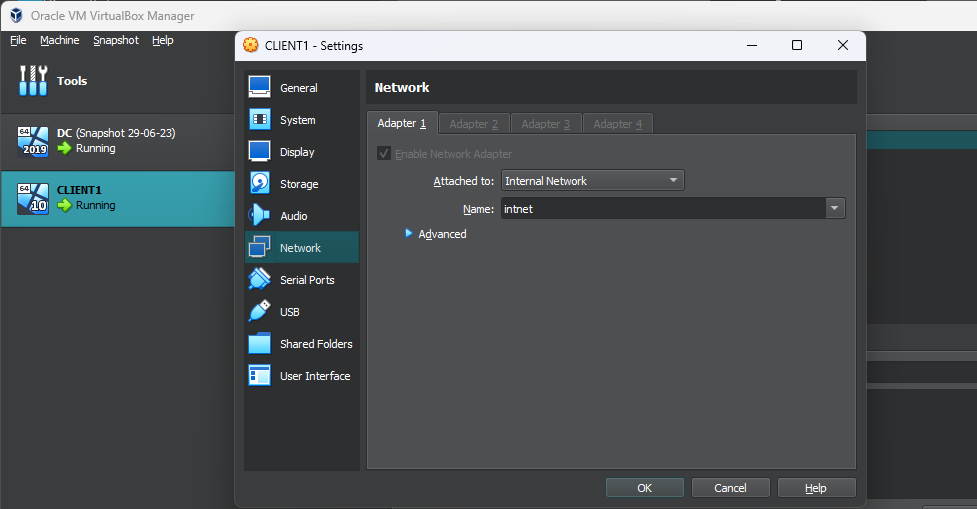
After a thorough examination, I uncovered an oversight in the VM configuration wherein I mistakenly chose "NAT" instead of "Internal Network." Realizing this error, I swiftly rectified the situation by switching it to "Internal Network."
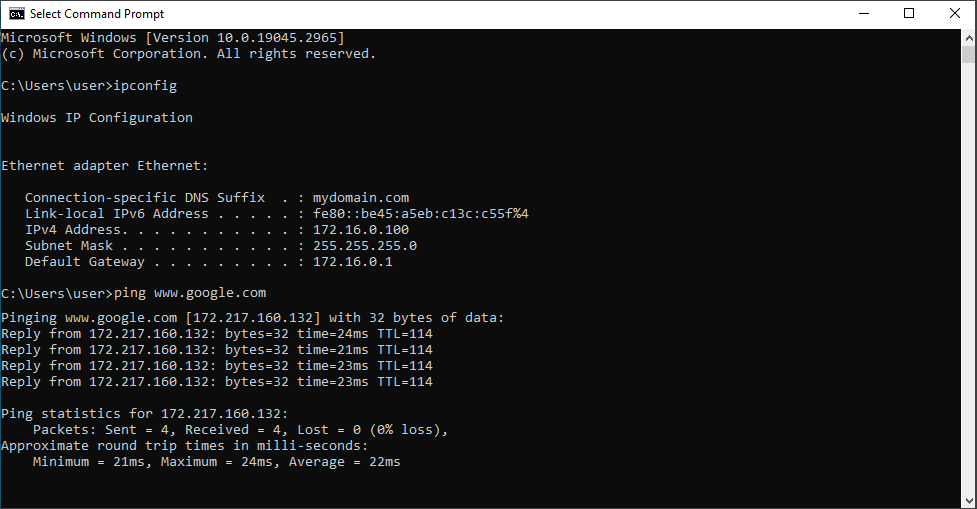
I confirmed the accurate assignment of the IP address by executing the "ipconfig" command in the command prompt. Furthermore, I conducted a successful ping test to google.com, which indicated the operational status of our DNS server and established connectivity up to the domain controller, serving as the default gateway. With proper Network Address Translation (NAT) in place, the domain controller effectively forwarded the traffic to the internet, enabling the echo reply from the ping to reach us seamlessly. As a result, our network infrastructure, depicted in the network diagram, is functioning as expected.
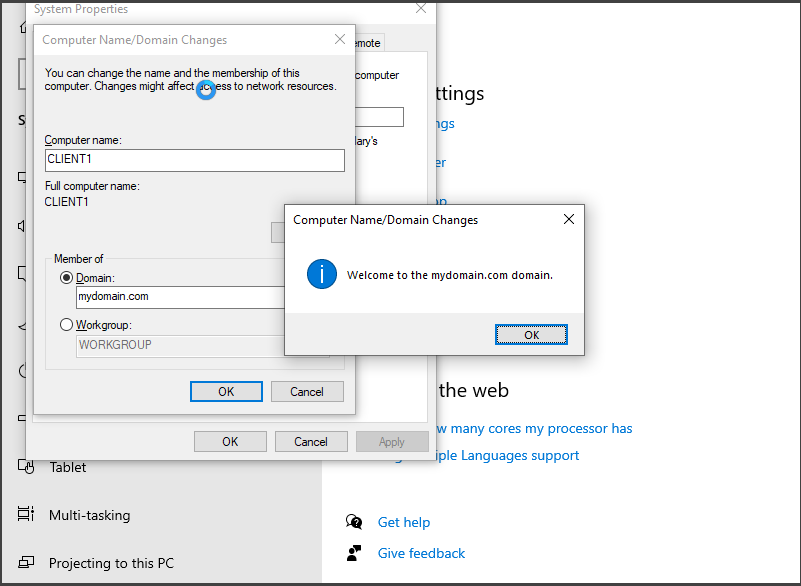
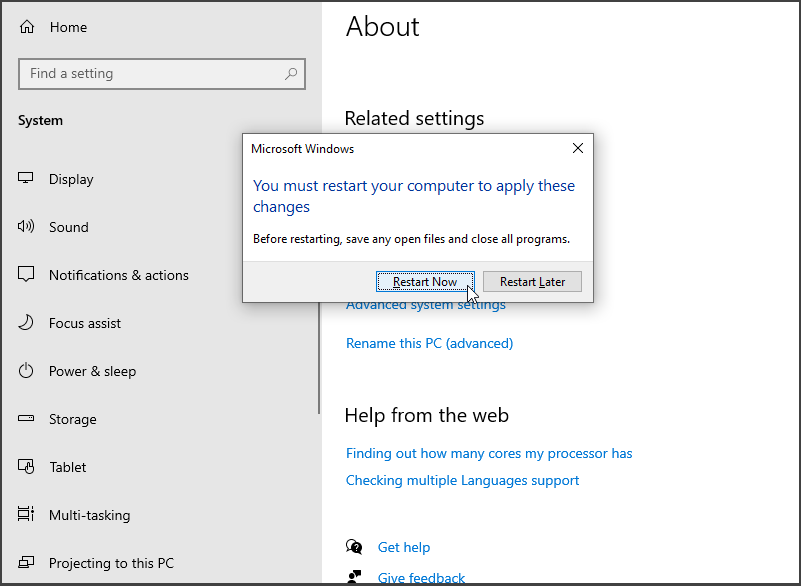
We are going to rename this PC and join the domain, "right-click" on the "Start Menu" and select "System." In the "System" window, locate the option labeled "Rename this PC (advanced)" and click on it to open the "System Properties" window. Within this window, click on the "Change" button.
In the "Computer Name/Domain Changes" window, enter "CLIENT1" as the new PC name. Choose the "Domain" option and enter "mydomain.com" as the domain name. Apply the changes by clicking "OK" and provide the necessary administrative credentials to authenticate with the domain controller. Finally, restart the PC by selecting "Restart Now" to complete the domain join operation.

In the "Address Leases" section of the "DHCP scope" on the "Domain Controller", we can see that CLIENT1 is listed. This indicates that when we added the client to the network, it automatically contacted the DHCP server and obtained an IP address assignment.
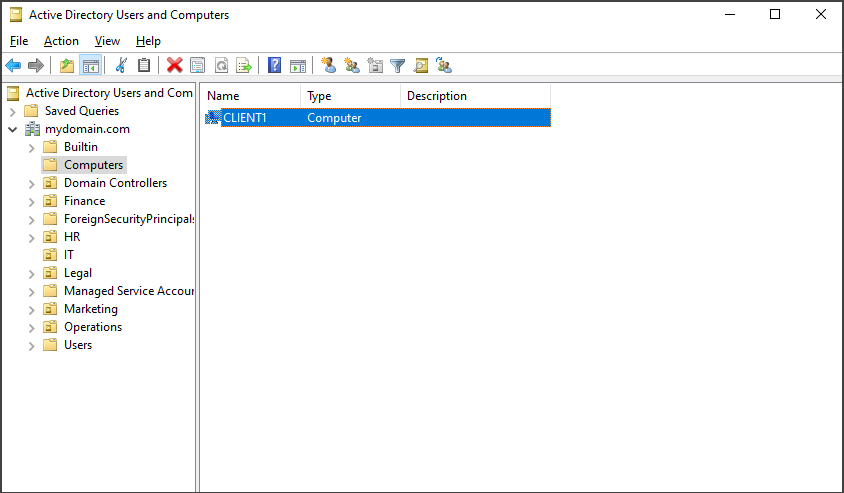
Also, In "Active Directory Users and Computers", on the "Domain Controller", when we go to the "Computers" container, we can see that the client computer automatically appears there after joining the domain, indicating its domain membership.

Since the client computer has joined the domain, we can use any of the created accounts to log in. Our next step is to proceed with logging into the computer using the username "aabrev" and password "MS@6264".

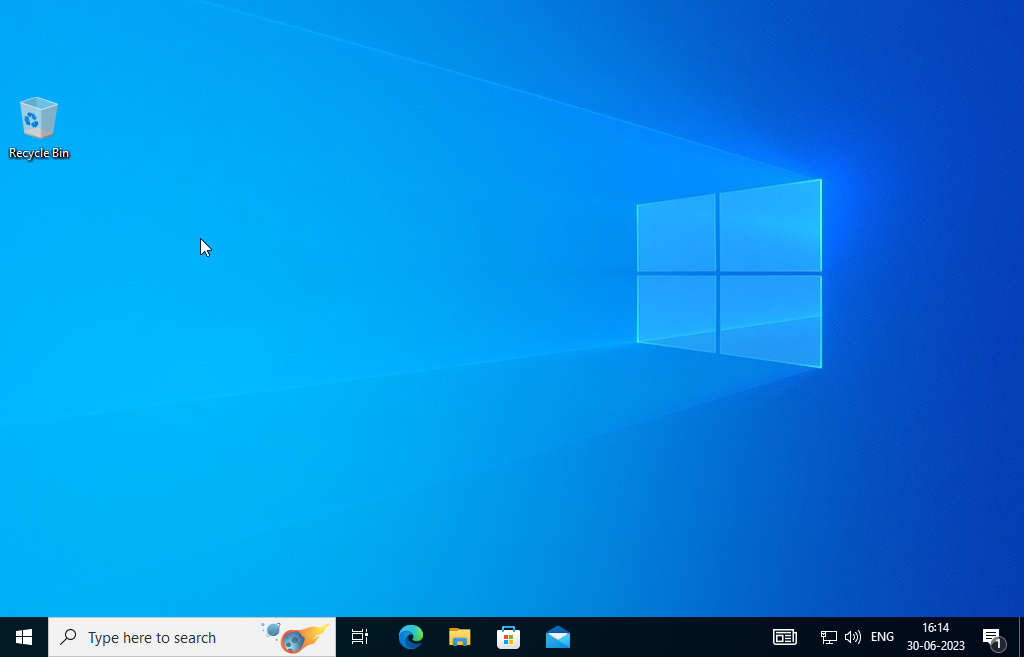
We can observe that we are successfully logged in, and our desktop is functioning as expected. By accessing the command line and executing the "who am i" command, we can verify our domain membership and authenticate our username as "aabrev."

In this Project, based on our network diagram, we have set up a mini corporate network. The account creation process mimics the hiring procedure and involves adding names to a batch file. Afterwards, the batch script executes and creates all the new accounts, including ours. Using the CLIENT1 virtual machine as our corporate laptop, we can effortlessly log in with our corporate credentials since it is connected to both the domain and network.
. . .